
Monday, 14 December 2015
Monday, 7 December 2015
Tinkercad design phone holder


This is my design. I have decided to create the
boys phone holder on Tinker cad. This design is similar to my sketch by having
the same shape and overall look, but the colors have changed a bit. I actually
wanted the color to be a bit lighter and let the color fade from the corners of
the holder to the middle of the phone holder. This design took me about an hour
to make because I had to make all the bits fit precisely together so the shape
looked slanted and stable. It took me a while to figure out how to slant the
top of the phone holder. I tried to make the charger resemble an I phone
charger because apple products seem more appealing to people nowadays. So if
people see a phone holder that resembles an apple product, the possibility of
them buying the phone holder will be much higher than if the charger looked
like another product.
Wednesday, 18 November 2015
Phone Holder Design Drawing
The first picture is for the boys phone holder:

The boys phone holder is originally blue but the colour and the design can be changed if you order one. For example on of the colours is white with a black dragon on it.
The second picture is the girls phone holder:

The girls phone hold is originally red/pink. The womens phone holder is usually smaller because girls tend to have smaller phones. When ordered, the design can also be changed into other colours and the design of your choice can be made.

Wednesday, 11 November 2015

Monday, 9 November 2015


Wednesday, 4 November 2015
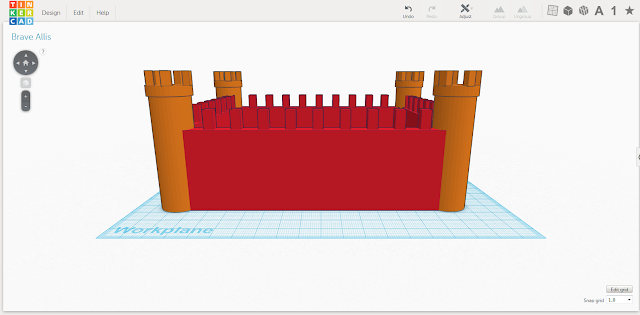
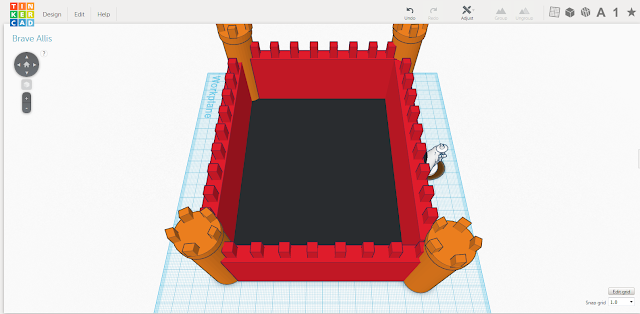
Tinkercad Castle design
This design was a pretty hard design to make. The most complex part is putting the rectangles on the castle equally. The easiest part for me was building the walls of the castle and making the castle floor. Sometimes I got stuck and I had to ask Ms.Veena or one of my friends. I think the castle that I made almost looks the same as the picture of the castle that we were supposed to re create.

 Method
To make the castle you need to follow these instructions
1. Select a square from the tool box and stretch it.
2. Copy the rectangle 3 times.
3. Place the rectangles next to eachother so that you are making a big square.
4. Drag another square from the toolbox to the work plane and flatten it.
5. Color the new flattened square black and place it in the middle of the big square.
6. In each of the corners of the walls, place a cylinder.
7. Drag another square from the toolbox to the workplane and make it small.
8. Place the small square ontop of one of the walls. Copy and paste this and put rectangles on each wall, with 1 centimeter spaces in between them.
9. Place the same rectangles on top of the cylinders.
Wednesday, 28 October 2015
3D Modelling and Design
Inquiry and Analysis
Statement of Inquiry: Digital Design &
Printing as a form of communication and output has evolved through time and
space to influence audience’s perspective.
Introduction
I am in
Emirates International School Meadows. I am a student of Information Technology
(IT). As part of our term 1 assessment we have started using a software called Tinker Cad. Computer Aided
design has created a program in which you can create 3D or 2D objects and
designs. It is also used to improve your skills in precision drawing and
technical illustrations.
As part of
my assessment task I have decided to create a phone holder, attached to a charger. The phone holder can be transformed into a schoolbag by pressing a button. A lot of kids are facing the problem of coming to class, and having to
use their phone when they realize their phone is low battery. Also students will not have to buy schoolbags anymore. Students will get
in trouble and have to do something else for the whole lesson due to the fact
that they have no device to research on. If they use the phone holder they will
be able to work faster and charge their phone at the same time. The price of the product
The software
Tinker Cad will be very suitable for creating the design.
Design
Specification:
The phone
holder is designed to help students study well in class. Like this, students will always be able to
work in class; students can now come into class with a phone that is low
battery and charge it while working. The phone holder will be a favoured colour
and will have designs on it. It will hold the phone by the side and the charger
will be attached to the bottom of the phone holder. Like this, the student can
put the phone on the phone holder and attach the charger to the phone. The
phone will charge whilst the students works in class. The charger is suitable
for any kind of phone and the holder is big enough for any phone of this
generation.


Thursday, 1 October 2015
Tinkercad Reflection
Today (Thursday, October 1st) we made an account on a website called Tinker cad. Tinker cad is an online app which allows you to create 3D designs and a 3D printing tool.
We signed up and got familiar to the online app. There were different lessons such as writing 3D words. You can change the size, the depth and a lot more of a shape or of a letter. My favorite lesson was learning how to make 3D glasses because it was fun but was also a bit of a challenge which made it even better. When you choose a lesson, clear instructions of what to do are shown. There are also little tips and outlines of the shapes to help you place it there. For instance if you were trying to write a specific 3D word there would be outlines of the letters as a guideline.
Overall I am looking forward to use Tinker cad again and can't wait to learn how to do more 3D digital designs.
Here is a description of how to make a Teddy Bear button.
Lesson:
Teddy Button
Step 1:
Get a cylinder from the geometrical tool box.
Step 2:
Scale it smaller to the height of 2 mm and the diameter of 14 mm.
Step 3:
Copy and paste the cylinder 2 times to make the ears. Scale the copy and pasted cylinders to a diameter of 5 mm and place them in the areas outlined in orange.
Step 4:
Drag a cylinder hole shape in the area outlined in orange.
Step 5:
Scale the cylinder to a smaller diameter of 2 mm and place it in the outlined area.
Step 6:
Copy and paste the cylinder hole 2 times to make the holes in the button.
Step 7:
Drag a roof shape to the Work plane.
Step 8:
Scale the shape smaller to the height of 2 mm and the diameter of 2 x 2 mm.
Step 9:
Rotate the shape to the marked area and choose the hole feature.
Step 10:
Drag a box hole shape to the Work plane.
Step 11:
Scale it smaller to the height of 2 mm and size of 0.5 x 2 mm.
Step 12:
Copy and paste the box hole. Move the hole to the outlined area.
Step 13:
Drag a cylinder hole shape to the Work plane.
Step 14:
Scale it smaller to the height of 2 mm and the diameter of 0.5 mm.
Step 15:
Copy and paste the cylinder hole and move it to the outlined areas. This part is challenging, be careful that you do not change the diameter when moving the cylinder holes around.
Step 16:
Select all the items and group them.

This is what your finished button should look like, if you want you can change the color of your teddy bear button just click on the shape and select any color. I liked creating the teddy bear button as it was an easy lesson and the outcome was good. There were 16 steps but they were all pretty simple.
Here are the instructions of how to make a simple heart ring.
Lesson:
Simple Heart Ring
Step 1:
Drag a heart shape to the work plane. The spot in which the heart should be placed is highlighted in orange.
Step 2:
Drag a circle to the highlighted space.
Step 3:
Select both items and group them by clicking the group button in the toolbox.
Step 4:
If you want you can change the color as explained in the teddy bear button instructions.

This is what your simple heart ring should look like. I found this lesson the most simple lesson on tinker cad as there were only 3 steps.
We signed up and got familiar to the online app. There were different lessons such as writing 3D words. You can change the size, the depth and a lot more of a shape or of a letter. My favorite lesson was learning how to make 3D glasses because it was fun but was also a bit of a challenge which made it even better. When you choose a lesson, clear instructions of what to do are shown. There are also little tips and outlines of the shapes to help you place it there. For instance if you were trying to write a specific 3D word there would be outlines of the letters as a guideline.
Overall I am looking forward to use Tinker cad again and can't wait to learn how to do more 3D digital designs.
Here is a description of how to make a Teddy Bear button.
Lesson:
Teddy Button
Step 1:
Get a cylinder from the geometrical tool box.
Step 2:
Scale it smaller to the height of 2 mm and the diameter of 14 mm.
Step 3:
Copy and paste the cylinder 2 times to make the ears. Scale the copy and pasted cylinders to a diameter of 5 mm and place them in the areas outlined in orange.
Step 4:
Drag a cylinder hole shape in the area outlined in orange.
Step 5:
Scale the cylinder to a smaller diameter of 2 mm and place it in the outlined area.
Step 6:
Copy and paste the cylinder hole 2 times to make the holes in the button.
Step 7:
Drag a roof shape to the Work plane.
Step 8:
Scale the shape smaller to the height of 2 mm and the diameter of 2 x 2 mm.
Step 9:
Rotate the shape to the marked area and choose the hole feature.
Step 10:
Drag a box hole shape to the Work plane.
Step 11:
Scale it smaller to the height of 2 mm and size of 0.5 x 2 mm.
Step 12:
Copy and paste the box hole. Move the hole to the outlined area.
Step 13:
Drag a cylinder hole shape to the Work plane.
Step 14:
Scale it smaller to the height of 2 mm and the diameter of 0.5 mm.
Step 15:
Copy and paste the cylinder hole and move it to the outlined areas. This part is challenging, be careful that you do not change the diameter when moving the cylinder holes around.
Step 16:
Select all the items and group them.
This is what your finished button should look like, if you want you can change the color of your teddy bear button just click on the shape and select any color. I liked creating the teddy bear button as it was an easy lesson and the outcome was good. There were 16 steps but they were all pretty simple.
Here are the instructions of how to make a simple heart ring.
Lesson:
Simple Heart Ring
Step 1:
Drag a heart shape to the work plane. The spot in which the heart should be placed is highlighted in orange.
Step 2:
Drag a circle to the highlighted space.
Step 3:
Select both items and group them by clicking the group button in the toolbox.
Step 4:
If you want you can change the color as explained in the teddy bear button instructions.

This is what your simple heart ring should look like. I found this lesson the most simple lesson on tinker cad as there were only 3 steps.
Monday, 28 September 2015
3D design and Modelling
Inquiring and Analysing
Introduction:
I am a Student of IT. I have created this blog to show you my term 1 work. My term one work is on 3D printing. We are using a software usedTinkercad I will update this blog with information on The evolution of Printers and other information. I will also update this blog with my work that I did on Tinkercad.
Johannes Gutenberg is the father of printmaking. He was born in 1398 and died on February 3, 1486. He was a German blacksmith, goldsmith, printer, and publisher who showed printing to Europe. This is a picture of his invention:

His invention was a mechanical movable printer, this started the printing revolution. This invention is known as the most important event of the modern period. Gutenberg in 1439 was the first European to use the printing press and movable type (his invention) in Europe. Some of his many contributions are: the invention of a process for mass-producing movable type, he used the oil based ink for printing books, adjustable molds, mechanical movable type, he used a wooden printing press similar to screw presses in his time.
Type of Printer
|
When was
it invented
|
Who
invented it
|
Technology
used
|
Advantage/Disadvantage
|
Laser
|
1969
|
Gary
Starkweather
|
Electrostatic
digital printing
|
They are
very quiet. They are the most expensive type of printer.
|
Dot Matrix
|
1968
|
Howard
|
Computer
Printing
|
These
types of printers are cheap. The output is not high resolution.
|
Thermal
|
c. 1972
|
Jack S.
Kilby
|
Heat
sensitive ribbon
|
They are
cheap. When the printer gets too hot it uses more ink than it actually should.
|
Inkjet
|
1951
|
Hewlett-Packard
|
Computer
printing (inkjet technologies)
|
The
printouts are usually wet when they come out. It has more compact than a
laser printer.
|
Daisy
Wheel
|
1969
|
David S.
Lee
|
Impact
printing
|
The print
quality is high. They are very noisy, slow and you have to change the ribbon.
|

Laser Printer
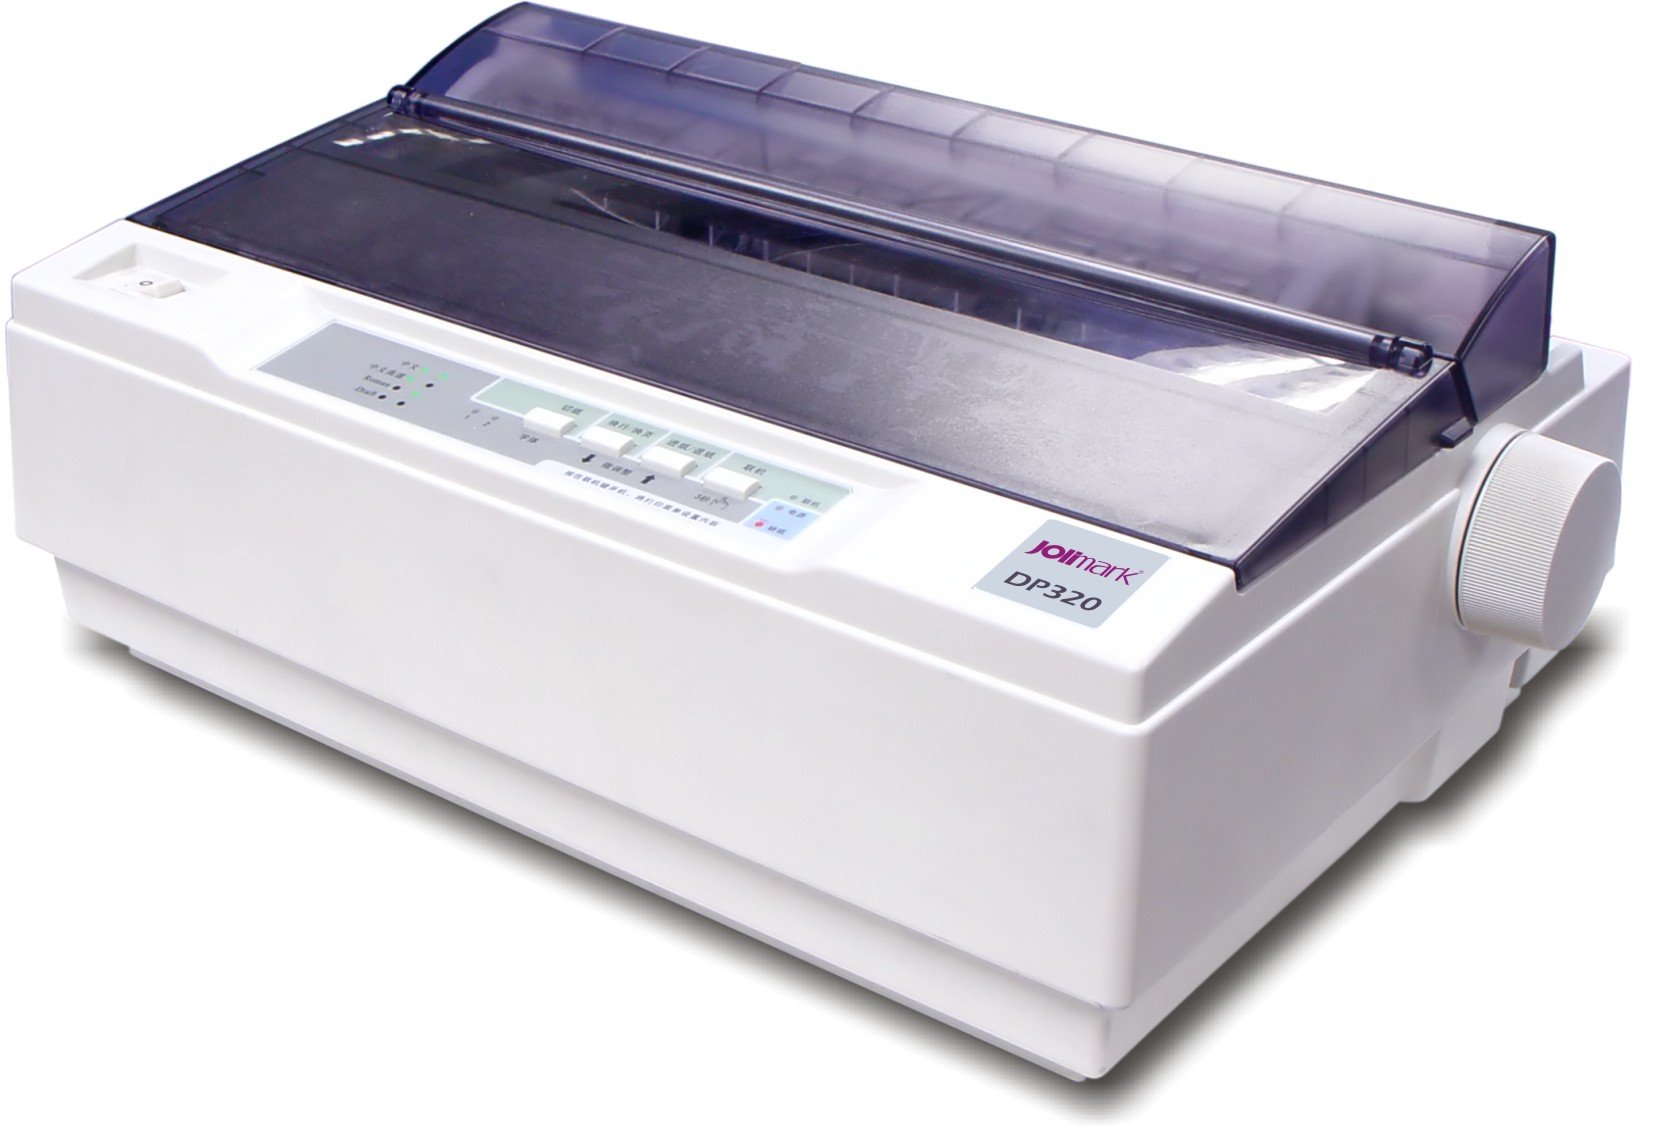
Dot Matrix Printer

Thermal Printer
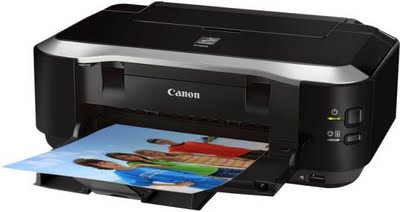
Inkjet Printer

Daisy Wheel Printer
In 1993 the world's first digital colour printing press was launched called Indigo. Overnight it changed the printing world - customers were able to choose short-run, personalised and high quality print straight from the desktop. The name of the printing press series is from a company made by Benny Landa in 1977 to invent the world’s fastest photocopier. Benny later discovered that the ink developed for the photocopier (the ink was called ElectroInk) can also be used in printers. ElectroInk uses small colour particles called Isopar that can be attracted or repelled by a voltage differential. The ink forms a thin and smooth plastic layer on the paper surface.
In 2000 the Hewlett Packard Company made a $100 million investment in Indigo, which represented 13% of the company's shares. A year later, on 6 September, HP said that it was to acquire the remaining shares for $629 million.
3D Printers
Chuck Hull invented 3D printing. 3D printing or additive manufacturing is the process of making three dimensional solid objects from a digital file. The making of a 3D printed object is achieved using additive processes. In an additive process an object is created by laying down successive layers of material until the entire object is created. Each of these layers can be seen as a thinly sliced horizontal cross-section of the eventual object.
The material used to create the 3D objects is Plastic. The plastic types that can be used are ABS plastic, PLA, Polyamide which is nylon, glass filled Polyamide, Stereolithography materials (epoxy resins), Silver, Titanium, Steel, Wax, Photopolymers and Polycarbonate.
It starts with making a virtual design of the object you want to create. The virtual design is made on a Computer (Computer Aided Design) file using a 3D modeling program (to be able to create a totally new object). A 3D scanner makes a whole 3D digital copy of the object that you want to create. 3D scanner have different ways to generate a model such as time-of-flight, structured/modulated light, volumetric scanning and many more methods.
Recently a lot of IT companies such as Microsoft and Google have enabled their hardware to do 3D scanning, a great example is Microsoft's Kinect. This shows that in the future hand held devices such as smartphones, Ipads/Tablets will have integrated 3D scanners. Digitizing real objects into 3D models will become as easy as taking a picture.
3D printing can be used for medical purposes. Prosthetic limbs can be created, though some of these 3D printed limbs are structurally sound and aesthetically pleasin, researches still have to do alot of research to actually be able to replace a limb with on of the 3D printed prosthetic limbs. Troy Baverstock is a 3D printing enthusiast and is a student at Australia's Griffith University. He made a 3D printed add on for prosthetic legs that contains various sensors to help prosthetic users keep track of their external and internal worlds.
People with an interest in 3D printing or doctors would use 3D printing as a new technology of prosthetic body parts.


References:
http://www.innovateus.net/innopedia/what-are-different-types-printmaking-0https://en.wikipedia.org/wiki/Main_Page
https://www.printed.com/history-of-digital-print
https://www.google.ae/search?safe=strict&q=who+invented+3d+printing&cad=b&biw=1600&bih=799&es_sm=93&cad=cbv&sei=TBMKVqCTG8SBUd_PmugN
https://www.google.ae/webhp?sourceid=chrome-instant&ion=1&espv=2&ie=UTF-8#q=what%20material%20is%20used%20for%203d%20printers
http://3dprinting.com/what-is-3d-printing/
http://3dprintingindustry.com/2015/09/17/smart-sensory-prosthetic-links-wearers-to-the-iot/
Subscribe to:
Comments (Atom)