
Monday, 14 December 2015
Monday, 7 December 2015
Tinkercad design phone holder


This is my design. I have decided to create the
boys phone holder on Tinker cad. This design is similar to my sketch by having
the same shape and overall look, but the colors have changed a bit. I actually
wanted the color to be a bit lighter and let the color fade from the corners of
the holder to the middle of the phone holder. This design took me about an hour
to make because I had to make all the bits fit precisely together so the shape
looked slanted and stable. It took me a while to figure out how to slant the
top of the phone holder. I tried to make the charger resemble an I phone
charger because apple products seem more appealing to people nowadays. So if
people see a phone holder that resembles an apple product, the possibility of
them buying the phone holder will be much higher than if the charger looked
like another product.
Wednesday, 18 November 2015
Phone Holder Design Drawing
The first picture is for the boys phone holder:

The boys phone holder is originally blue but the colour and the design can be changed if you order one. For example on of the colours is white with a black dragon on it.
The second picture is the girls phone holder:

The girls phone hold is originally red/pink. The womens phone holder is usually smaller because girls tend to have smaller phones. When ordered, the design can also be changed into other colours and the design of your choice can be made.

Wednesday, 11 November 2015

Monday, 9 November 2015


Wednesday, 4 November 2015
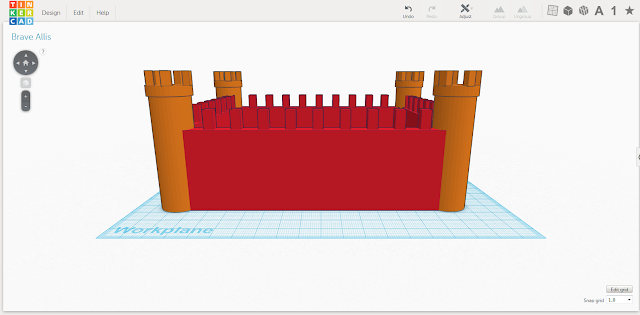
Tinkercad Castle design
This design was a pretty hard design to make. The most complex part is putting the rectangles on the castle equally. The easiest part for me was building the walls of the castle and making the castle floor. Sometimes I got stuck and I had to ask Ms.Veena or one of my friends. I think the castle that I made almost looks the same as the picture of the castle that we were supposed to re create.

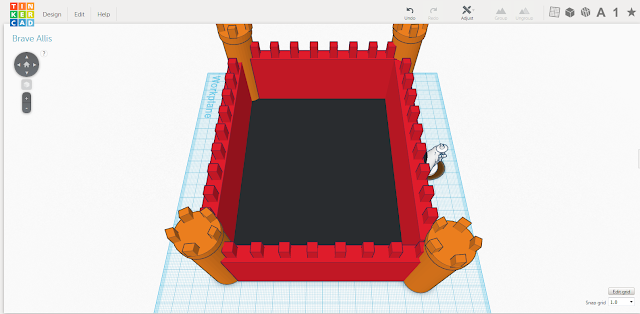 Method
To make the castle you need to follow these instructions
1. Select a square from the tool box and stretch it.
2. Copy the rectangle 3 times.
3. Place the rectangles next to eachother so that you are making a big square.
4. Drag another square from the toolbox to the work plane and flatten it.
5. Color the new flattened square black and place it in the middle of the big square.
6. In each of the corners of the walls, place a cylinder.
7. Drag another square from the toolbox to the workplane and make it small.
8. Place the small square ontop of one of the walls. Copy and paste this and put rectangles on each wall, with 1 centimeter spaces in between them.
9. Place the same rectangles on top of the cylinders.
Wednesday, 28 October 2015
3D Modelling and Design
Inquiry and Analysis
Statement of Inquiry: Digital Design &
Printing as a form of communication and output has evolved through time and
space to influence audience’s perspective.
Introduction
I am in
Emirates International School Meadows. I am a student of Information Technology
(IT). As part of our term 1 assessment we have started using a software called Tinker Cad. Computer Aided
design has created a program in which you can create 3D or 2D objects and
designs. It is also used to improve your skills in precision drawing and
technical illustrations.
As part of
my assessment task I have decided to create a phone holder, attached to a charger. The phone holder can be transformed into a schoolbag by pressing a button. A lot of kids are facing the problem of coming to class, and having to
use their phone when they realize their phone is low battery. Also students will not have to buy schoolbags anymore. Students will get
in trouble and have to do something else for the whole lesson due to the fact
that they have no device to research on. If they use the phone holder they will
be able to work faster and charge their phone at the same time. The price of the product
The software
Tinker Cad will be very suitable for creating the design.
Design
Specification:
The phone
holder is designed to help students study well in class. Like this, students will always be able to
work in class; students can now come into class with a phone that is low
battery and charge it while working. The phone holder will be a favoured colour
and will have designs on it. It will hold the phone by the side and the charger
will be attached to the bottom of the phone holder. Like this, the student can
put the phone on the phone holder and attach the charger to the phone. The
phone will charge whilst the students works in class. The charger is suitable
for any kind of phone and the holder is big enough for any phone of this
generation.


Subscribe to:
Posts (Atom)